
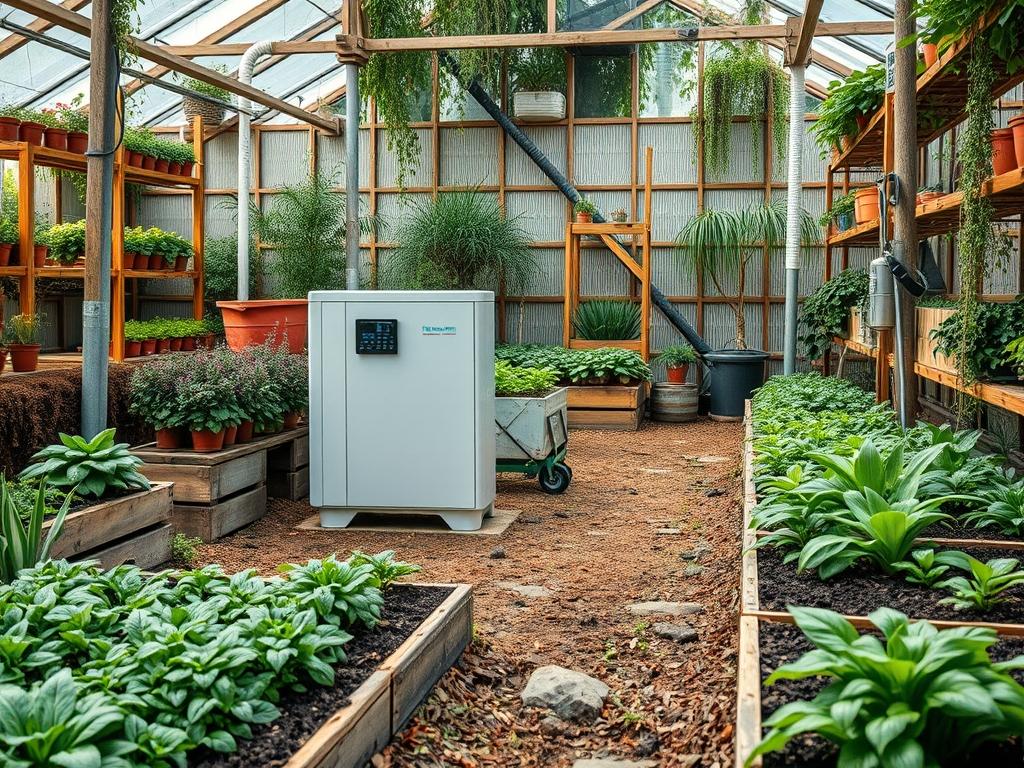
The modern outdoor environment has evolved beyond simple aesthetic appreciation into a functional extension of the home interior. As we integrate high-end lighting, automated irrigation, and outdoor kitchen appliances, the demand for localized power has surged. This transition introduces a significant architectural challenge: how to incorporate Smart Garden Energy Storage without compromising the visual integrity of the landscape. A successful design ensures that the infrastructure supporting your digital ecosystem remains invisible or aesthetically cohesive. We must consider the thermal performance of battery enclosures, the proximity to high-demand zones, and the protection of hardware from the corrosive effects of moisture and soil acidity. Achieving this requires a rigorous approach to spatial planning, where energy autonomy becomes a silent partner to lush greenery and structured hardscaping.
Curb appeal is often the primary driver for residential landscaping, yet the functional longevity of a project relies on its invisible systems. Integrating energy storage involves more than just placing a weather-rated box in a corner. It requires an understanding of the site microclimate, ensuring that solar arrays or battery units are not stifled by a lack of airflow or excessive heat. Proper placement within the property footprint can significantly reduce the cost of electrical trenching while maximizing the efficiency of energy distribution. By treating energy storage as a core utility, similar to a drainage system or a gas line, we can build outdoor spaces that are both beautiful and technologically resilient.
Landscape Design Principles
Symmetry and focal points dictate how the human eye navigates an outdoor space. When planning for a Smart Garden Energy Storage system, these principles help mask the utilitarian nature of the hardware. Using a central axis allows you to balance a storage enclosure on one side with a similar architectural element, such as a raised planter or a decorative pedestal, on the other. This creates a sense of intentionality rather than an afterthought. If the energy hub is located near a primary seating area, it should be integrated into a built-in bench or a retaining wall to maintain a clean visual line.
Elevation layers are equally vital for successful integration. By using tiered planting beds, a landscape architect can hide electrical sub-panels and battery units at the lowest tier, obscured by mid-height shrubbery. This layering provides a vertical transition that softens the hard edges of the equipment. Furthermore, walkway design should provide clear access for maintenance without making the utility zone a primary destination. Using materials like slate pavers or decomposed granite ensures a stable surface for technicians while blending into the surrounding natural palette.
Visual balance extends to the choice of materials. If your energy storage unit features a metallic or industrial finish, surrounding it with natural stone like flagstone or fieldstone provides a textural contrast that anchors the technology to the earth. Irrigation planning must also be synchronized with energy placement. Water lines and electrical conduits should be separated by at least 12 inches of horizontal distance to mitigate risks during future excavations. A comprehensive plan treats the power source as the heart of the garden, pumping functionality to far-reaching corners through a hidden network of subterranean veins.
Plant and Material Selection
The following table provides a selection of plant species and materials suited for screening and surrounding energy storage installations. These choices prioritize low maintenance and structural density to provide year-round concealment.
| Plant Type | Sun Exposure | Soil Needs | Water Demand | Growth Speed | Maintenance |
| :— | :— | :— | :— | :— | :— |
| Emerald Green Arborvitae | Full Sun | Well-drained | Moderate | Medium | Low |
| Karl Foerster Grass | Full Sun / Part Shade | Loamy | Low | Fast | Annual Cutback |
| Boxwood (Winter Gem) | Part Shade | Rich, Moist | Moderate | Slow | Pruning |
| Creeping Thyme | Full Sun | Sandy/Poor | Very Low | Medium | Minimal |
| Limelight Hydrangea | Full Sun / Part Shade | Consistent Moisture | High | Fast | Seasonal Deadhead |
| Japanese Yew | Shade / Part Sun | Acidic | Low | Slow | Low |
For the housing materials, recommend using marine-grade plywood for interior framing and powder-coated aluminum for external vents. These materials withstand the rigors of UV exposure and humidity. When choosing a base for the storage unit, a 4-inch poured concrete pad or a level gravel bed consisting of 3/4-inch crushed stone provides the necessary stability to prevent shifting over time.
Implementation Strategy
The successful deployment of a Smart Garden Energy Storage solution begins with rigorous site grading. Ensure the area intended for the unit is at a higher elevation than the surrounding lawn to prevent water pooling against the enclosure. A 2 percent slope away from the equipment is the standard recommendation for proper runoff. Before any planting begins, map out the PVC conduit runs. Use Schedule 40 PVC for underground wiring, buried at a minimum depth of 18 inches to comply with most local building codes and protect against accidental spade strikes.
Once the infrastructure is laid, focus on the edging and mulch. Define the utility zone with steel edging or Belgian block to keep turf grass from encroaching on the ventilation ports of the battery system. Apply a 3-inch mulch depth using triple-shredded hardwood mulch or pine bark nuggets. This suppresses weeds and maintains soil moisture levels for the surrounding screen plants, but ensure the mulch is kept at least 6 inches away from any air intakes to prevent clogs.
Hardscaping should be the final structural step. If the energy storage is large, consider a small dry stack stone wall to act as a decorative screen. This wall provides a thermal buffer, shielding the batteries from direct afternoon sun, which can degrade performance and longevity. Finally, install the smart sensors and monitoring hardware. These should be mounted in a location that is easily accessible for a smartphone signal but protected from direct rain by a small overhang or shroud.
Common Landscaping Failures
The most common failure in integrated garden design is poor drainage leading to moisture ingress in electrical systems. If the site is not graded correctly, water will follow the path of least resistance, often down the side of electrical conduits and into the battery housing. This can lead to short circuits or accelerated corrosion of terminals. Another frequent error is root overcrowding. Planting vigorous species like running bamboo or certain willow varieties too close to energy hubs will inevitably result in root systems infiltrating conduit joints or lifting the concrete mounting pads.
Soil compaction is a silent killer of both plants and infrastructure. Heavy machinery used during the installation of energy storage units often packs the earth so tightly that oxygen can no longer reach plant roots, and water can no longer permeate the soil. This leads to a “bathtub effect” where the excavated hole for the battery unit fills with water that has nowhere to go. To avoid this, always use aeration tools or tilling to loosen the soil in the planting zones after the heavy lifting is completed. Improper spacing of screen plants is also a major issue; homeowners often plant for immediate privacy, forgetting that the plants will double in width within three years, eventually choking off the necessary airflow to the energy system.
Seasonal Maintenance
Maintenance requirements fluctuate with the seasons, requiring a proactive approach to protect your investment. In the spring, inspect all electrical connections for signs of pest interference. Rodents often seek warmth in energy enclosures during the winter. Clear any debris from the drainage grates and re-edge the beds to maintain a clean separation between the lawn and the utility zone. This is also the time to apply a slow-release fertilizer to your screening plants to encourage lush growth before the heat of summer.
Summer maintenance focuses on thermal management. Ensure that no drooping branches are blocking the exhaust fans of your Smart Garden Energy Storage system. If a heatwave is predicted, check that the irrigation system is providing enough moisture to the surrounding plants to maintain their cooling transpirational effects. In autumn, the primary goal is leaf management. Spent foliage can accumulate quickly around air intakes, posing a fire risk or causing the system to overheat. Use a leaf blower or stiff rake to keep the area completely clear of organic litter.
Winter requires a different strategy. In colder climates, ensure that snow is not allowed to drift over the top of the storage unit, as this can block vents and trap moisture. If the system is not in use during the winter months, maintain a trickle charge to prevent the battery cells from reaching a deep discharge state, which can be permanent in cold temperatures. Periodically check that the sealants on the enclosure remain intact and have not cracked due to freeze-thaw cycles.
Professional Landscaping FAQ
How far should I plant shrubs from my energy storage unit?
Maintain a minimum clearance of 24 inches between the unit and any mature foliage. This allows for adequate airflow and provides space for technicians to perform maintenance without damaging the plants or the equipment.
Can I hide my battery storage under a wooden deck?
Yes, but only if there is sufficient ventilation and a minimum of 12 inches of vertical clearance. The area must be well-drained and accessible via a hatch or removable panel for safety inspections.
What is the best base material for heavy energy units?
A 4-inch reinforced concrete slab is the gold standard for stability. For smaller systems, a compacted base of crushed limestone topped with leveling sand and heavy-duty pavers is a suitable alternative.
Will the heat from the battery affect my plants?
Most smart storage systems are well-insulated. However, exhaust vents can release warm air. Avoid placing delicate, heat-sensitive plants like hostas directly in the path of the exhaust; instead, use hardy ornamental grasses.
How do I protect the electrical conduits from shovel strikes?
Install plastic warning tape approximately 6 inches above the conduit during the backfilling process. This provides a visual cue to anyone digging in the future that high-voltage lines are located directly below.