
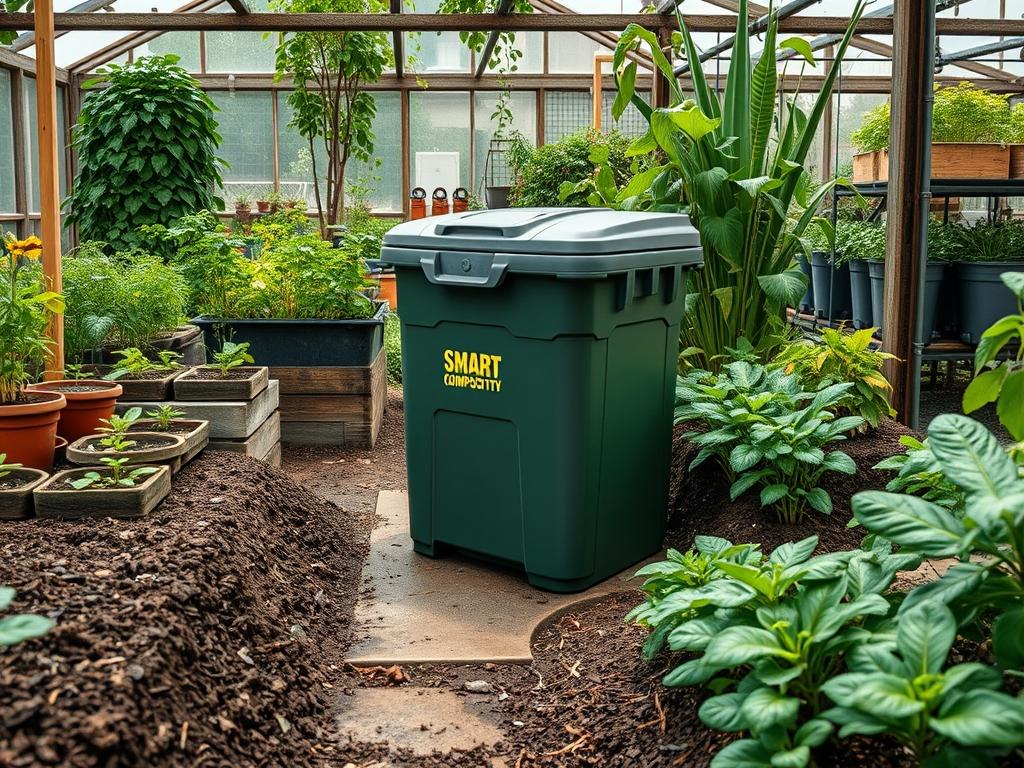
The integration of high-performance waste management into a luxury landscape requires a departure from traditional “hidden corner” mentalities. For decades, homeowners relegated decomposition to the furthest reaches of the property to avoid odors and aesthetic degradation. However, the emergence of Smart Composting Bins has transformed this necessity into a sophisticated design element. As a landscape architect, the challenge lies in balancing the biological requirements of rapid decomposition with the visual requirements of a curated outdoor living space. Modern bins utilize internal sensors, automated aeration, and temperature controls to accelerate the breakdown of organic matter, which necessitates a strategic placement that considers both utility and curb appeal. A well-placed unit should be accessible enough for daily use yet integrated enough to feel like a permanent fixture of the hardscape. This transition from a passive pile to an active, tech-driven system allows for much tighter integration into primary garden zones.
Achieving this balance involves a deep understanding of site microclimates and human traffic patterns. We must consider the prevailing winds to ensure that even the minimal odors from a high-tech unit do not drift toward dining areas. Furthermore, the unit must be positioned on a stable, level surface to ensure the internal weight-sensing mechanisms function correctly. By treating the compost station as an essential utility, much like an outdoor kitchen or an irrigation controller, we can design environments that are both beautiful and ecologically productive. The goal is to create a seamless loop where the landscape produces waste that is processed on-site and returned to the soil as high-grade nutrients.
LANDSCAPE DESIGN PRINCIPLES
Effective landscape design for modern utility zones relies heavily on the principle of screening without suffocating. Smart Composting Bins require adequate airflow to maintain aerobic conditions, so they cannot be trapped in a completely sealed enclosure. Instead, we utilize layers of vegetation and architectural screens to create visual privacy. Using a series of Cedar slats or Corten steel panels can provide a contemporary aesthetic that complements the sleek design of modern bins. These structures should be spaced at least 4 inches apart to permit consistent cross-ventilation.
Symmetry plays a vital role in integrating these units into formal gardens. If a bin is placed on the southern side of a pathway, a mirrored element, such as a matching Planter Box or a storage bench, should be placed on the northern side to maintain equilibrium. Focal points are equally important; rather than making the bin the center of attention, we direct the eye toward a specimen tree or a water feature using sightlines. The bin then becomes an auxiliary component of the broader layout. Elevation layers also help in masking the functional aspects of the garden. By placing the composting zone on a slightly lower terrace, perhaps 12 inches below the main patio height, the unit is obscured by the natural change in grade. This tiered approach, combined with precision-cut Bluestone or Granite walkways, ensures that the path to the compost bin feels like an intentional journey through the garden rather than an afterthought.
PLANT AND MATERIAL SELECTION
Selecting the right plant palette around a composting zone is critical for managing moisture and providing a natural windbreak. The plants must be hardy enough to handle the slightly higher nitrogen levels sometimes found in the surrounding soil, while also serving as a lush backdrop.
| Plant Type | Sun Exposure | Soil Needs | Water Demand | Growth Speed | Maintenance Level |
| :— | :— | :— | :— | :— | :— |
| English Boxwood | Full Sun to Shade | Well-Drained | Moderate | Slow | High (Pruning) |
| Green Giant Arborvitae | Full Sun | Adaptable | Low to Moderate | Fast | Low |
| Lavender (Phenomenal) | Full Sun | Sandy/Gritty | Very Low | Moderate | Low |
| Karl Foerster Grass | Full Sun | Neutral | Moderate | Fast | Low |
| Japanese Yew | Part Shade | Rich/Moist | Moderate | Slow | Medium |
| Oakleaf Hydrangea | Part Shade | Acidic/Loamy | High | Moderate | Medium |
The choice of hardscape materials is equally important for the footprint of the Smart Composting Bins. We recommend a foundation of Compacted Crushed Limestone or a Concrete Pad at least 4 inches thick. This prevents the bin from sinking as it fills with heavy, moist organic matter. Surrounding the base with River Rock or Polished Pebbles can facilitate drainage and prevent mud from accumulating around the interface of the machine.
IMPLEMENTATION STRATEGY
The installation process begins with precision grading. The site for the composting station must be perfectly level to prevent the internal mixing blades of the Smart Composting Bins from straining against the chassis. We typically excavate to a depth of 6 inches, backfilling with 4 inches of 3/4-inch Clean Stone and topping it with a Fine Aggregate for leveling. This creates a permeable base that allows any incidental runoff to leach into the sub-soil rather than pooling on the surface.
Once the base is established, we focus on edging. Using Heavy-Duty Steel Edging or Belgium Block, we define the boundary between the utility zone and the surrounding mulch or turf. This prevents invasive grass roots from encroaching on the unit and makes maintenance much easier. For the surrounding garden beds, a 3-inch layer of Double-Shredded Hardwood Mulch is applied. This helps regulate soil temperature and moisture for any nearby screening plants. Irrigation planning is the final step; we run a dedicated 1/2-inch Drip Line to the screening plants but ensure the emitters are positioned at least 2 feet away from the bin to prevent moisture from entering the electronic components.
COMMON LANDSCAPING FAILURES
One of the most frequent mistakes in garden planning is failing to account for the weight of the compost. A large-capacity bin can exceed 400 pounds when fully loaded with wet kitchen scraps and brown matter. Placing such a unit on soft turf or thin Pavers will inevitably lead to shifting and cracking. Another common failure is root overcrowding. Designing a tight screen of Evergreens too close to the unit can lead to poor air circulation, causing the plants to develop fungal diseases like Powdery Mildew and reducing the efficiency of the bin’s cooling fans.
Drainage inefficiencies are also a major concern. If the landscape is graded toward the composting station, heavy rains will saturate the base, potentially short-circuiting the electronics of Smart Composting Bins. We always ensure a 2 percent pitch away from the unit. Finally, many homeowners neglect the “working radius” required for maintenance. You need at least 36 inches of clear space in front of the unit to comfortably remove the finished compost drawer and perform seasonal cleaning. If the surrounding plants are too dense, the bin becomes a chore to use, defeating the purpose of a high-tech system.
SEASONAL MAINTENANCE
In the spring, focus on cleaning the exterior of the Smart Composting Bins and checking the power connections for any winter damage. Prune any Ornamental Grasses or Perennials that have started to lean toward the unit. This is also the time to refresh the Mulch and inspect the Drip Irrigation system for leaks.
Summer maintenance involves managing the heat. Ensure the unit’s ventilation ports are free of spider webs or debris. If the bin is in direct sun, consider using a Shade Cloth or adjusting the growth of nearby shrubs to provide filtered light during the hottest part of the afternoon. This prevents the internal sensors from overheating and maintains optimal microbial activity.
As autumn arrives, the volume of organic waste typically increases with falling leaves and garden cleanouts. Monitor the bin’s capacity more frequently and use a Square Point Shovel to clear any leaves that accumulate around the base. This prevents moisture from being trapped against the unit’s housing.
Winter requires a shift toward insulation and accessibility. In colder climates, ensure the path to the bin is kept clear of snow using a Plastic Snow Shovel to avoid scratching any nearby hardscaping. While Smart Composting Bins are designed to operate in various temperatures, keeping the unit shielded from harsh northerly winds will reduce energy consumption as the internal heaters work to maintain the decomposition process.
PROFESSIONAL LANDSCAPING FAQ
Can I place a smart bin directly on my lawn?
It is not recommended. The weight will compact the soil and kill the grass. Use a stable base of Concrete Pavers or Crushed Stone to ensure the unit remains level and the internal mechanisms function without interference.
How do I hide the power cord in a luxury garden?
We recommend installing a 1/2-inch PVC Conduit underground to bridge the gap between your outdoor outlet and the bin. This protects the wire from mowers and String Trimmers while maintaining a clean, wireless aesthetic for your landscape.
Will the heat from the bin harm my plants?
Most Smart Composting Bins are well-insulated, but the exhaust air can be warm. Maintain a 12-inch gap between the exhaust vents and any soft foliage. Use hardy species like Glossy Abelia if the unit is in a tight space.
What is the best way to handle compost runoff?
Modern smart units are self-contained and rarely leak. However, as a precaution, installing a small French Drain or a bed of River Rock beneath the unit will safely manage any incidental moisture and prevent staining on your patio.
How often should I clean the area around the bin?
A quick monthly sweep with a Stiff Bristle Broom is sufficient. Check for debris in the air intake monthly to ensure maximum efficiency. This prevents the motor from overworking and extends the lifespan of your smart investment.