
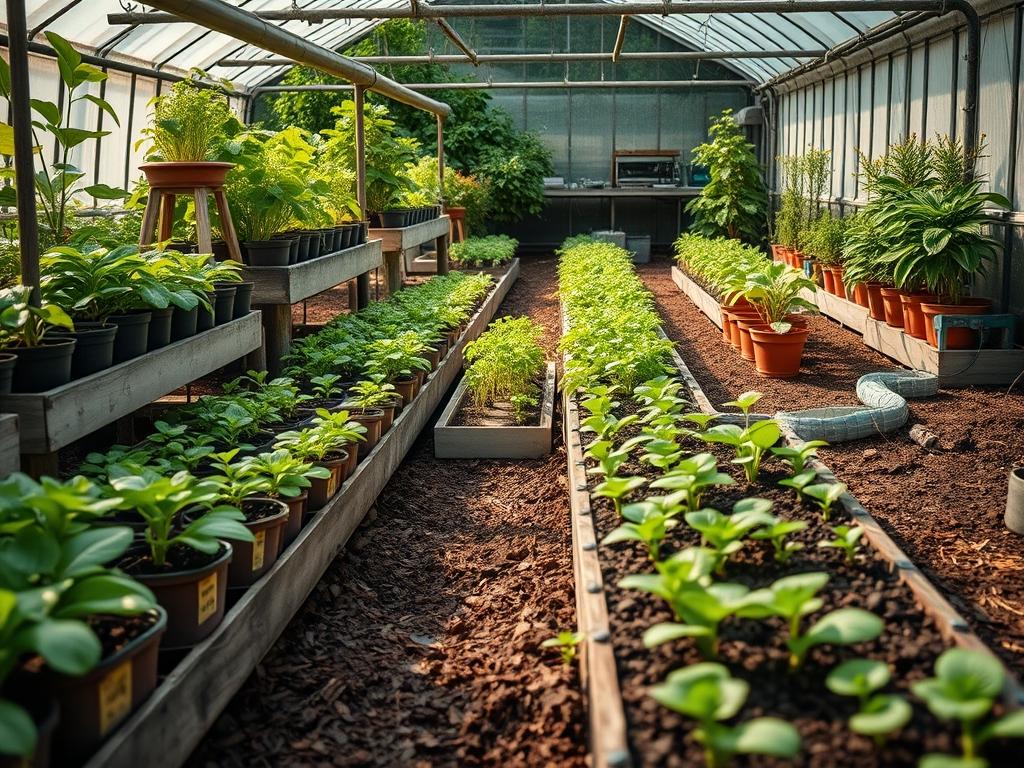
Establishing a professional landscape begins long before the first trowel hits the soil. For the modern landscape architect, the challenge lies in bridging the gap between a conceptual site plan and the physical reality of thousand-unit plantings. Achieving the necessary curb appeal and functional density for a high end property requires a level of plant uniformity that traditional nursery sourcing often fails to provide. This is where Automated Seed Starting in controlled indoor environments becomes a critical component of the planning process. By leveraging technology to manage the earliest stages of botanical development, designers can ensure that every Perennial or Ornamental Grass used in a project meets the exact specifications for size, health, and vigor. This systematic approach allows for better budget control and a more predictable timeline for outdoor installation.
The climate of the region often dictates the scheduling of these indoor grow operations. In northern zones, the indoor room serves as a defensive perimeter against late frosts and unpredictable spring rains. In more arid environments, it provides the humidity and temperature stability necessary for delicate seedlings to develop the robust root structures required for survival once they are moved to the harsher outdoor site. Beyond the practicalities of survival, the aesthetic success of a landscape depends on the rhythm and repetition of plant materials. When a designer specifies a 30 foot border of uniform Lavender, the visual impact is lost if the individual specimens vary in height or color. Automation removes the variable of human error in watering and lighting, resulting in a crop of “architectural grade” plants ready to fulfill their role in the broader environmental design.
Landscape Design Principles
Successful garden planning relies on the fundamental concepts of symmetry and visual balance. In a landscape context, symmetry is often achieved through the use of matched pairs or geometric grids. Using Automated Seed Starting allows the architect to produce hundreds of genetically identical plants simultaneously. This ensures that the left and right sides of a formal walkway remain perfectly mirrored as the plants mature. When plants are started in batches with automated LED grow lights set to a precise 16 hour photoperiod, their growth rates remain synchronized. This synchronization is the backbone of rhythm in the garden, creating a sense of intentionality and order that defines professional-grade installations.
Focal points and elevation layers are also planned with greater precision when the designer controls the starting phase. By staggering the start dates in the grow room, one can create “stair-step” elevation layers even before the plants are moved outdoors. For example, taller background species like Switchgrass can be given a 4 week head start over mid-ground fillers. This ensures that on the day of planting, the vertical hierarchy is already established. Furthermore, integration with irrigation planning begins in the grow room. Seedlings that are raised using Capillary Mats or automated Drip Manifolds develop root systems that are better adapted to the concentrated moisture delivery systems used in modern hardscaped gardens.
Plant and Material Selection
| Plant Type | Sun Exposure | Soil Needs | Water Demand | Growth Speed | Maintenance Level |
| :— | :— | :— | :— | :— | :— |
| Lavender (Lavandula) | Full Sun | Sandy Loam | Low | Moderate | Medium |
| Boxwood (Buxus) | Full to Part Sun | Well-drained | Moderate | Slow | High |
| Echinacea (Coneflower) | Full Sun | Organic Compost | Moderate | Fast | Low |
| Switchgrass (Panicum) | Full Sun | Heavy Clay/Loam | Low to Med | Fast | Low |
| Creeping Thyme | Full Sun | Gritty/Rocky | Low | Moderate | Low |
| Hostas | Full Shade | Rich Humus | High | Moderate | Medium |
Implementation Strategy
The implementation of an automated indoor system starts with the infrastructure of the grow room. Designers should specify a dedicated space equipped with Waterproof Flooring and stabilized environmental controls. The core of the system is the Environmental Controller, a device that correlates data from Soil Moisture Sensors and Hygrometers to trigger action. To begin, use 72-cell plug trays filled with a sterile, soilless peat-perlite mix. This medium prevents the introduction of soil-borne pathogens and ensures optimal aeration for emerging roots.
Once the seeds are sown, set the Heat Mats to precisely 75 degrees Fahrenheit to facilitate rapid germination. Automation software should be programmed to manage the Exhaust Fans, maintaining a CO2 level that promotes vigorous photosynthesis without allowing heat to build up beyond 80 degrees. As the first true leaves appear, the automated Nutrient Dosers should be engaged. These systems inject a diluted solution of 10-10-10 Liquid Fertilizer into the irrigation line, ensuring that every seedling receives a consistent EC (Electrical Conductivity) level.
As the site preparation moves to the backyard, the transition strategy becomes paramount. Before transplantation, the outdoor soil must be graded to ensure a 2 percent slope away from building foundations. This prevents water from pooling around the new arrivals. Install Steel Edging or Stone Borders to define the beds and prevent turf encroachment. When move-in day arrives, the “hardened off” seedlings are placed according to the site plan, typically on 12 inch or 18 inch centers. Immediately after planting, a 3 inch layer of Double-shredded Hardwood Mulch should be applied. This mulch acts as a protective barrier, retaining the moisture provided by the automated Drip Irrigation Tubes and suppressing weed competition while the young plants establish themselves in the local ecosystem.
Common Landscaping Failures
The most frequent failure in automated systems is a lack of sensor calibration leading to drainage mistakes. If a Tensiometer fails, the system might saturate the Grow Trays, leading to a condition known as damping off. This fungal disease can wipe out an entire season of inventory in less than 48 hours. In the outdoor landscape, a similar failure occurs when the transition from a controlled environment to the field ignores soil compaction. If the ground is not properly tilled and amended with Expanded Shale or Compost, the highly optimized root systems from the grow room will hit a “clay wall” and stop growing, leading to stunted plants that never reach their design potential.
Improper spacing is another common pitfall. Designers often overcompensate for small seedling size by planting too densely. Within two seasons, this leads to root overcrowding and poor air circulation, which invites powdery mildew and pest infestations. Furthermore, irrigation inefficiencies often arise when the automated indoor schedule is not adjusted for outdoor evaporation rates. A seedling that thrived on 50 milliliters of water in a humid grow room will require significantly more volume when exposed to wind and direct afternoon sun. Failure to recalibrate the Irrigation Controller during the first 14 days of sun exposure is often fatal.
Seasonal Maintenance
Spring is the season of transition. The primary task is the gradual acclimation of indoor seedlings to UV light and fluctuating temperatures. This involves moving plants outdoors for 2 hours on the first day and increasing the duration over a 10 day period. This “hardening off” process strengthens the cell walls and prepares the plants for the permanent environment. Landscape beds should be cleared of winter debris, and any Pre-emergent Herbicide should be applied before the mulch is refreshed.
Summer maintenance focuses on system audits. As temperatures rise, check the Drip Emitters for clogs caused by mineral buildup. Ensure that the Mulch remains at a depth of at least 2 inches to protect the shallow root systems of the young plants from heat stress. Autumn is the time for structural evaluation and soil testing. If any plants failed to thrive, the soil should be tested for pH imbalances. This is also the time to clean and sterilize the indoor Grow Tents and Trays with a 10 percent bleach solution in preparation for the next cycle. Winter is the planning phase; it is the ideal time to update the automation software, replace worn LED Bulbs, and order new seed stock based on the successes and failures of the previous year.
Professional Landscaping FAQ
What is the primary benefit of automation for a home landscape?
Automation ensures consistency across hundreds of plants. It eliminates the human error associated with manual watering and lighting; resulting in a professional, uniform aesthetic that increases curb appeal and reduces the need for expensive, large-scale plant replacements later.
How deep should the mulch be for new seedlings?
Maintain a depth of 2 to 3 inches. This thickness is sufficient to suppress weed growth and retain soil moisture without suffocating the roots or preventing oxygen exchange; which is vital for the transition from the indoor grow room to the outdoors.
Can I use regular garden soil in an automated grow room?
No; you should use a sterile Peat-based Mix. Garden soil is too dense for automated trays and often contains pathogens or weed seeds that thrive in the warm and humid conditions of an indoor grow environment; potentially ruining your entire crop.
How do I prevent root rot in an automated system?
Include Perlite for drainage and use Moisture Sensors to prevent overwatering. Ensure your Environmental Controller is programmed to allow the top 0.5 inches of the medium to dry slightly between irrigation cycles to promote oxygenation and healthy root development.
What lighting is best for starting landscaping plants indoors?
Full-spectrum LED Grow Lights are the industry standard. They provide the necessary blue wavelengths for vegetative growth while remaining energy efficient. Position them approximately 6 to 12 inches above the plants to prevent leggy growth and ensure strong, compact stems.