
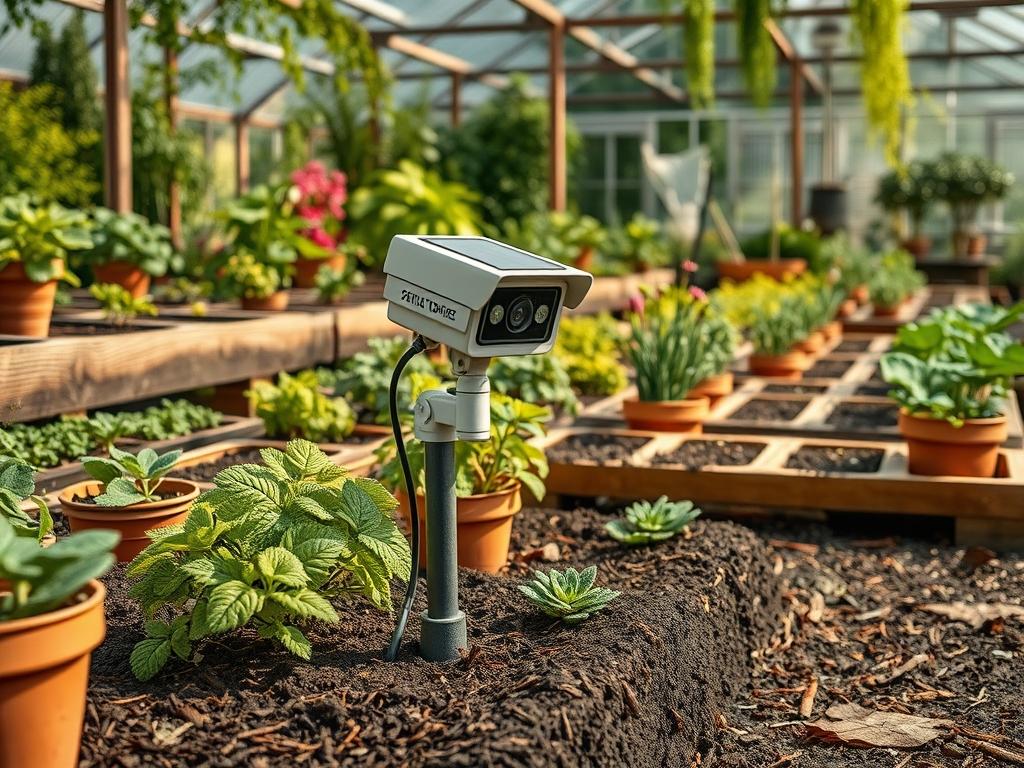
The modern landscape is no longer a static arrangement of flora and hardscaping; it has evolved into a sophisticated outdoor environment where security technology must coexist with natural beauty. Integrating Solar Powered Garden Cameras into a professional landscape design presents a unique challenge for both the homeowner and the architect. One must balance the technical requirements of hardware, such as unobstructed sun exposure and clear sightlines, with the aesthetic goals of curb appeal and plant health. A poorly placed device can disrupt the visual flow of a retaining wall or become buried under the rapid growth of a clumping bamboo hedge. Conversely, a well executed plan ensures the camera remains a discreet but effective sentry, powered by the very environment it protects. Achieving this synergy requires a deep understanding of microclimates, as solar efficiency depends heavily on the seasonal path of the sun through the garden canopy.
Functionality in the garden is paramount. Every element, from the drainage system to the placement of landscape lighting, serves a purpose. When we introduce wireless security technology, we must consider how the outdoor living space is actually used. A camera overlooking a swimming pool or an outdoor kitchen must be positioned to respect privacy while maintaining security. Furthermore, the climate of the region dictates the durability of the hardware and the types of plants that can surround it. In high humidity areas, dense foliage can lead to fungal growth on camera lenses, while in arid regions, windborne dust can degrade the efficiency of photovoltaic cells. Successful integration hinges on viewing the camera not as an after-thought, but as a structural component of the garden grid.
Landscape Design Principles
Professional landscaping relies on the core principles of symmetry, focal points, and elevation layers. When planning for Solar Powered Garden Cameras, these principles act as a guide for placement. Symmetry allows for the strategic positioning of cameras in pairs, perhaps flanking a stone entryway or a wooden pergola, which masks their presence within the architectural lines. High elevation points are often preferred for surveillance, but they must be balanced visually so the equipment does not dominate the skyline of the garden. Utilizing multi-level terraces or raised garden beds can provide the necessary height without the need for unsightly tall poles.
Visual balance is achieved by layering plants of varying heights. A low-growing groundcover in the foreground, followed by mid-sized perennials, and backed by tall privacy shrubs, creates a depth that can naturally frame a camera. This layering also helps in managing the irrigation zones. Water should never be directed toward electronic components; therefore, camera locations must be mapped out alongside the drip irrigation or sprinkler heads to avoid direct spray. Focal points, like a specimen tree or a water feature, naturally draw the eye away from security devices, allowing technology to fade into the background while the landscape takes center stage.
Plant and Material Selection
Selecting the right plant palette is crucial when designing around solar technology. You need species that provide structure without blocking the sun or interfering with the camera field of view.
| Plant Type | Sun Exposure | Soil Needs | Water Demand | Growth Speed | Maintenance Level |
| :— | :— | :— | :— | :— | :— |
| English Boxwood | Full Sun to Shade | Well-Drained | Moderate | Slow | Low |
| Lavender | Full Sun | Sandy/Gravelly | Low | Medium | Medium |
| Dwarf Fountain Grass | Full Sun | Adaptable | Low | Fast | Low |
| Creeping Phlox | Full Sun | Moist/Well-Drained | Moderate | Medium | Low |
| Japanese Maple | Partial Shade | Slightly Acidic | Moderate | Slow | Medium |
| Blue Star Creeper | Full Sun to Partial | Moist | Moderate | Fast | Low |
Materials used in the surrounding area should also be chosen for their reflective properties and durability. White marble chips or light-colored gravel at the base of a mounting post can help reflect additional light toward a solar panel. In contrast, dark hardwood mulch absorbs heat, which can be beneficial in cooler climates but may stress plant roots in the summer. Using non-corrosive metal brackets and UV-stabilized mounting hardware ensures that the installation survives the elements as gracefully as the surrounding stonework.
Implementation Strategy
Implementing a garden layout that includes Solar Powered Garden Cameras begins with an accurate site survey. Use surveyor stakes and marking paint to outline the proposed locations of all hardscape elements and large plantings. It is essential to perform a “sunlight audit” at various times of the day to identify shadows cast by existing structures or mature trees. If the camera is planned near a brick garden wall, ensure the orientation allows for at least 6 hours of direct sunlight to hit the solar panel.
Once the layout is marked, grading becomes the priority. Proper grading ensures that water flows away from the foundations of mounting poles and security posts. If the terrain is uneven, a French drain consisting of a 4-inch perforated pipe and river rock should be installed to prevent pooling. When it comes to the actual installation, use a post hole digger to reach a depth of at least 24 inches for any free standing poles to ensure stability against wind anchors. Surround the base with compacted crushed stone rather than just soil to prevent leaning over time. For the finishing touch, apply a 3-inch layer of double-ground mulch to retain moisture for nearby plants while providing a clean, professional look to the base of the tech installation.
Common Landscaping Failures
One of the most frequent mistakes in tech-integrated landscaping is the failure to account for the mature size of plants. A Leyland Cypress might look perfect next to a camera today, but in five years, its massive spread will completely obscure the lens. Overcrowding roots is another common issue. When cameras are mounted on heavy poles, the concrete footings can compete with the root zones of nearby Oak trees or Maples, leading to stunted growth or structural instability for the camera.
Drainage mistakes often lead to the premature failure of garden technology. If a camera is placed at the bottom of a slope without an adequate retaining wall or diversion trench, silt and water will accumulate around the base, potentially short-circuiting the system or causing the mounting hardware to rust. Soil compaction is also a silent killer. Heavy foot traffic or construction equipment used during the installation of flagstone patios can crush the soil structure, preventing water from reaching plant roots and causing the ground to shift under electronic mounts. Lastly, irrigation inefficiency, such as sprinkler heads misting directly onto solar panels, creates hard water deposits that significantly reduce power absorption.
Seasonal Maintenance
Landscape management is a year round commitment that changes with the seasons. In the spring, focus on pruning back the winter growth of climbing vines or ornamental grasses that may have begun to encroach on the camera view. This is also the time to check the integrity of all mounting screws and weatherproof seals that may have contracted during the cold months.
Summer maintenance involves managing the rapid growth of the garden. Use hedge shears to keep a clear line of sight and wipe down solar panels with a microfiber cloth to remove pollen and dust. During the autumn, the primary task is leaf management. Falling debris from Deciduous trees can quickly cover a solar panel, cutting off its power supply. Clear gutters and check that the downspouts are not directing water toward any tech-heavy areas. Winter requires vigilance against snow and ice. Ensure that heavy snow loads are gently brushed off Solar Powered Garden Cameras and check that the weight of ice hasn’t caused any overhead branches to sag into the camera path.
Professional Landscaping FAQ
How do I hide a camera without blocking its solar panel?
Integrate the camera into the architectural lines of a pergola or trellis. Use climbing roses or clematis trained to grow around the mount, ensuring the solar panel remains positioned at the highest point to catch unobstructed sunlight.
Can I mount a solar camera directly onto a tree?
It is generally discouraged by landscape architects. As the tree bark expands and the trunk grows, it can displace the camera mount. Furthermore, the tree canopy often creates too much shade for consistent solar charging throughout the year.
What is the best groundcover to use around a camera pole?
Creeping Thyme or Blue Star Creeper are excellent choices. These low profile plants provide a lush green carpet that requires zero pruning, ensuring they never grow tall enough to interfere with the camera sensors or the solar collector.
How do I prevent irrigation water from damaging my solar camera?
Utilize drip irrigation lines buried beneath 2 inches of soil or mulch. This delivers water directly to the root zones of your plants and eliminates the aerial spray associated with traditional pop-up spray heads that causes lens spotting.
Will the camera affect the growth of my nearby plants?
No, a standard Solar Powered Garden Camera does not emit enough heat or light to disrupt plant cycles. However, ensure the physical mount does not girdle any branches or compress the root flares of ornamental shrubs during the installation process.